

Configuration of the SAP System
Fabasoft iArchiveLink can only be used with a well-configured SAP system. The next chapters describe several configuration steps.
Output Device
First it has to be checked whether an output device for Fabasoft iArchiveLink is configured. If no output device is configured, a new one has to be created. Perform the following steps:
- Start the transaction “SPAD” and click “Display” next to Output Devices.
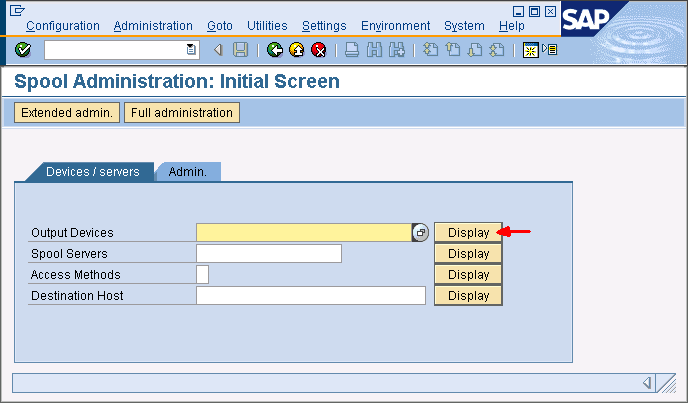
- If there is no entry with Dev. type “ARCHLINK”, create a new one.

- To switch into edit mode click “Change”
 or F8 and then click “Create”
 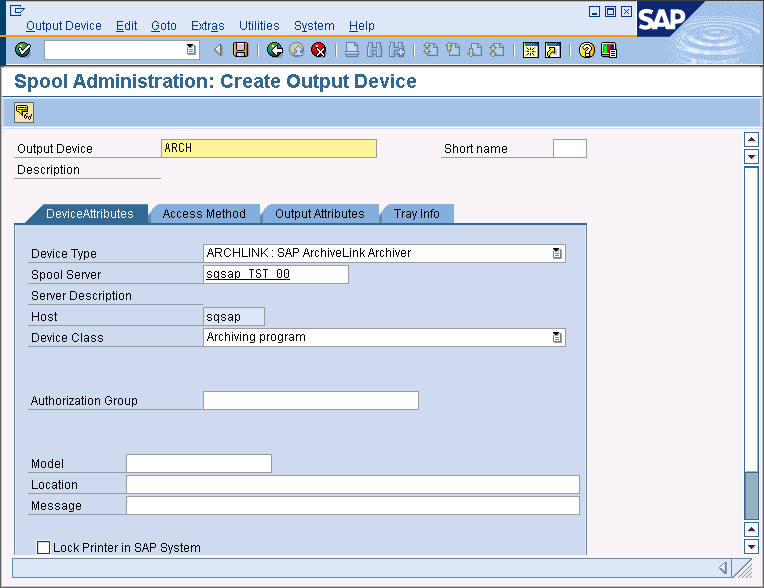 or Shift+F1.
 - Configure the output device on the “DeviceAttributes” tab.

Click the “Access Method” tab and define the Host Spool Access Method.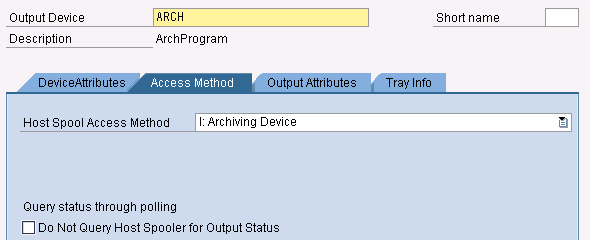
- Afterwards click “Save”
 to save the changes.
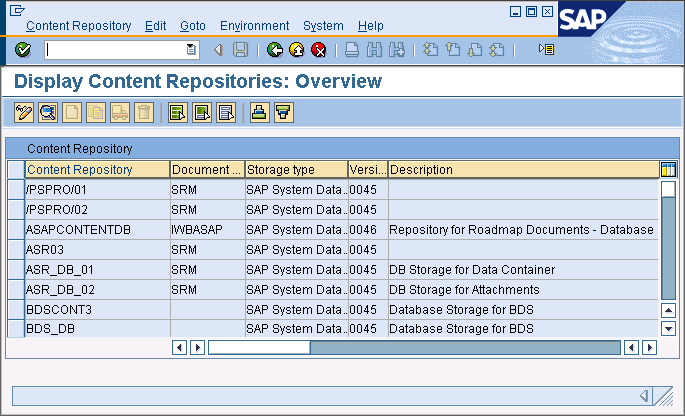
Content Repository
In SAP the Fabasoft iArchiveLink HTTP content server has to be configured as content repository.
Perform the following steps:
- Start the transaction “OAC0”.

- To switch into edit mode click “Display/Change”
 .
. - Create and configure a new entry for Fabasoft iArchiveLink ( or F5).
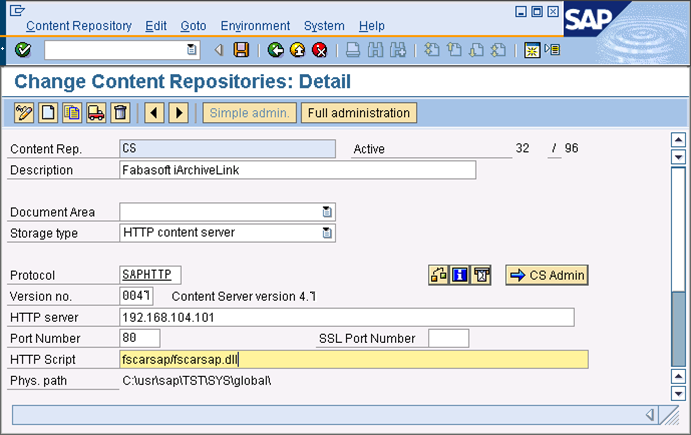
- Ensure that you are in “Full administration” mode by using the corresponding buttons.
- The following options must be configured at least:
- HTTP server
Type the IP address or server name of the Fabasoft iArchiveLink server. - Port Number
Specify the port on which the Fabasoft iArchiveLink Service is listening (typically in a Microsoft Windows environment: 80 and in a Linux environment: 17050). - No Signature
The checkbox needs to be unchecked. - HTTP Script
Specify the HTTP script. Type “FSCArSap/fscarsap.dll”.
- HTTP server
- Use “Test Connection”
 to test the connection between SAP and the Fabasoft iArchiveLink Service.
 - Click “Send Certificate”
 to send the certificate to the Fabasoft iArchiveLink Service.
 - Click “Exit”
 to save the configuration settings.
Note: If one Fabasoft iArchiveLink Service should connect to several SAP systems it is mandatory that each content repository ID is unique and each certificate has a unique common name.
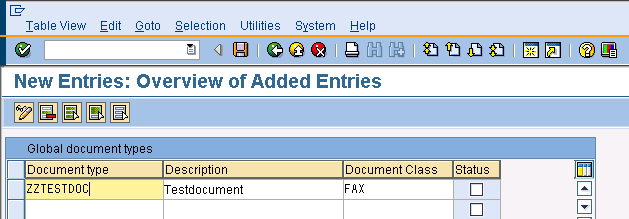
Document Type
For testing purpose create your own document types. The names of these document types have to start with “Z” (e.g. “ZZPRILIST”).
To create a new document type, perform the following steps:
- Start the transaction “OAC2”.
- Click “New Entries”.
- Specify the settings for the new document type (e.g. FAX, PDF or DOC in the “Document Class” field).
- Afterwards the document type has to be linked.
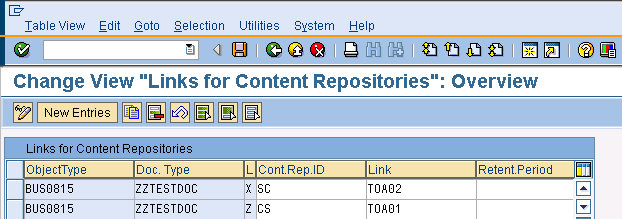
Link for Content Repository
To link a document type, perform the following steps:
- Start the transaction “OAC3”.
- To switch into edit mode click “Display/Change” .
- Click “New Entries”.
- Create a new entry for the desired document type.
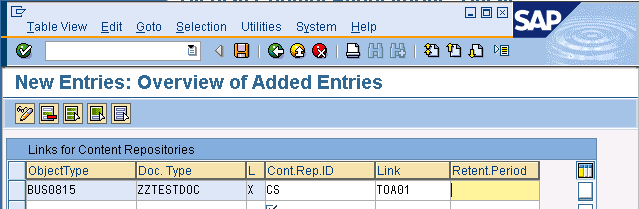
Note: Only links with “L=X” will be active. - Click “Save” to save the configuration.
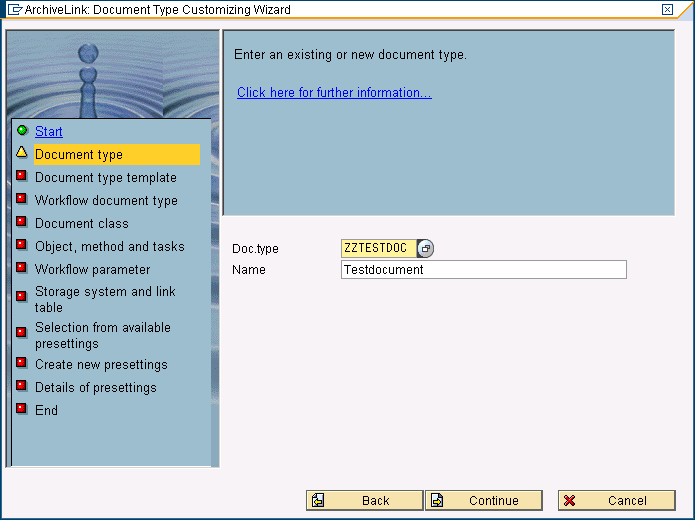
Document Type Customizing Wizard
The document type customizing wizard can be used to specify workflow pre-settings for existing document types or new document types created using this wizard.
Perform the following steps:
- Start the transaction “OAD5”.
- Select the document type created before and click “Continue”.
- Select a document type template and click “Continue”.
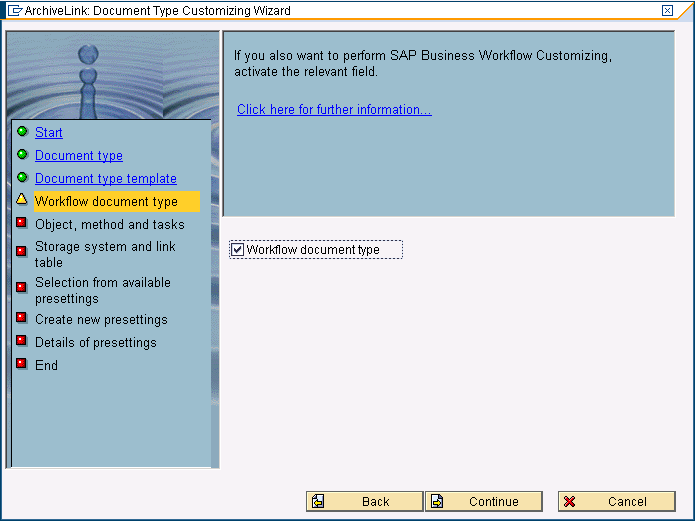
Note: If no template is selected the default value is incoming invoice. - Select the checkbox “Workflow document type” to define workflow pre-settings and click “Continue”.
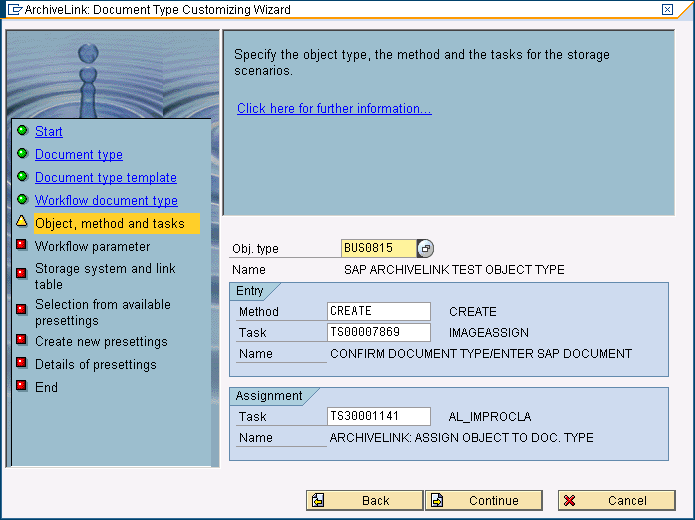
- Specify the object type. Select “CREATE” as entry method and specify the tasks. Afterwards click “Continue”.
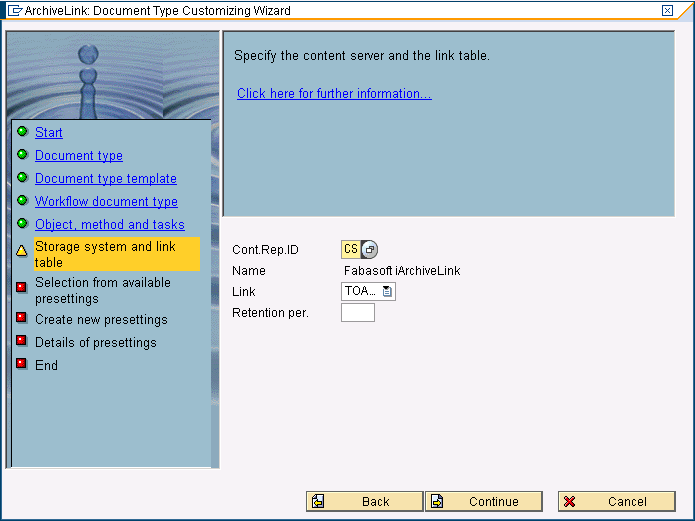
- Specify the content server and the link table and click “Continue”
- Select available pre-settings if you want to maintain these. Otherwise click “Continue” without selecting.
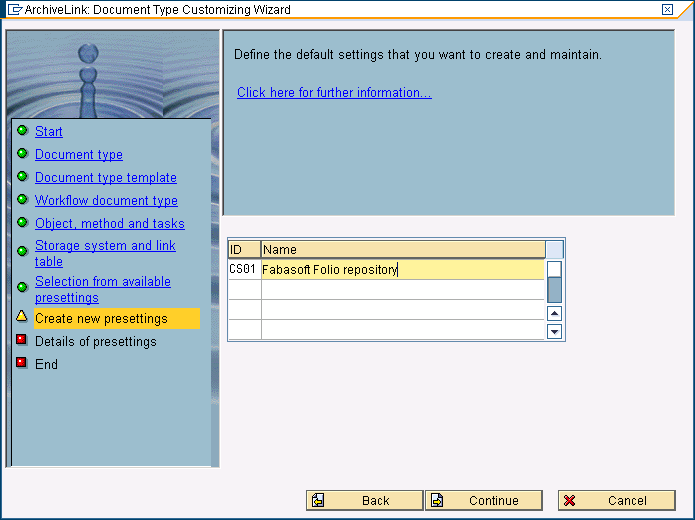
- To create new pre-settings specify a unique ID and the name. Afterwards click “Continue”.
- Define the details of the pre-settings. Select an organizational unit for which these pre-settings will take effect and configure appropriate restrictions. Click “Continue”.

- Click “Complete” to finalize the configuration.
Note: Start the transaction “OAWD”. The pre-settings defined before should be available.
Configuration of the GUI Integration
To configure the GUI integration, perform the following steps:
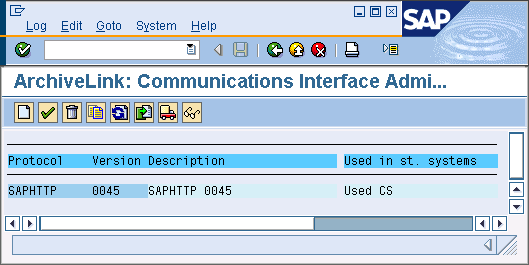
- Start the transaction “OAA3”.
- Double-click “SAPHTTP” to edit this protocol.
- Click “Application maintenance”.
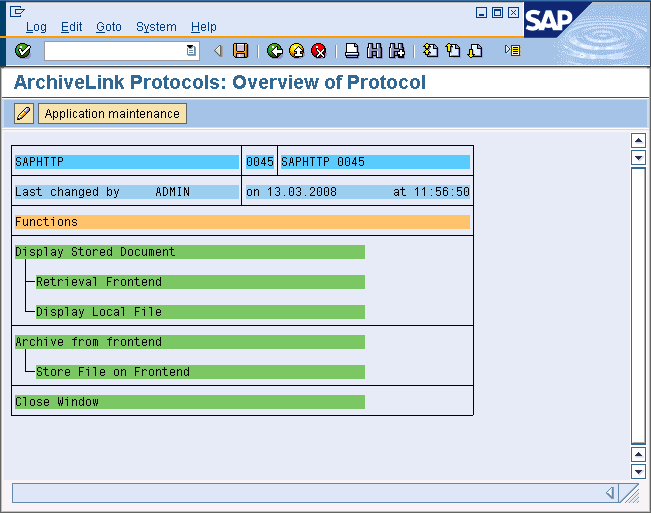
- Click “Create” to create a new application.
- Double-click the new application.
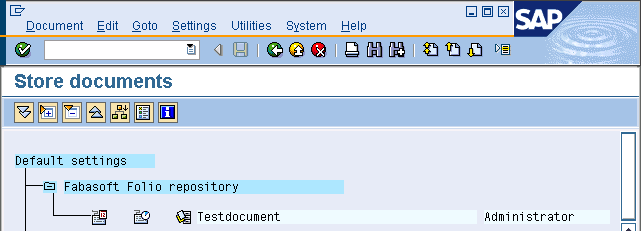
- Double-click “Display Stored Document” and configure the settings of the stored documents. Afterwards click “Back”.
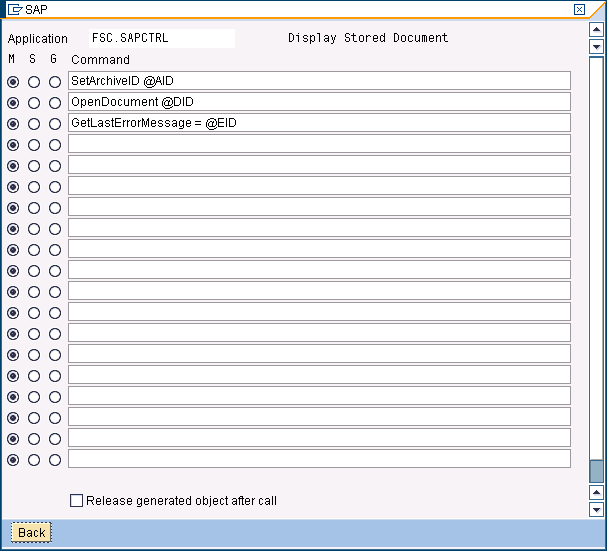
Note: In Version 25 you have to replace Application with FOLIOPM25.SAPEXTENSION.
- Double-click “Archive from Frontend” and configure the settings. Afterwards click “Back”.

- Note: In Version 25 you have to replace Application with FOLIOPM25.SAPEXTENSION.
- Click “Save” to save the settings.
- Click “Back”
 twice to switch back to “ArchiveLink Protocols: Overview of Protocol”.
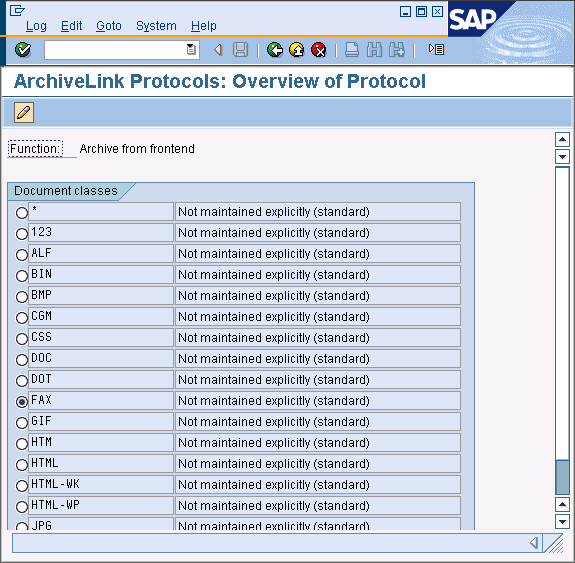
 - Double-click “Archive from frontend”. Select a document class that should be maintained and double-click this document class or click “Change” .
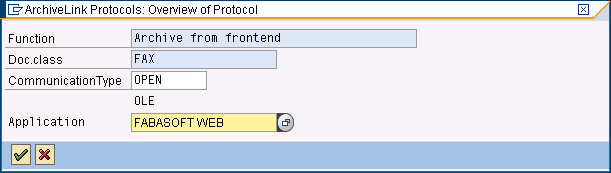
- Select the communication type “OPEN (OLE)” and the application created before. Click “Continue”
 .
.
- Repeat the last two steps for all document classes that should be maintained. Afterwards click “Save” to save the configuration.
- Double-click “Display Stored Document”. To maintain the stored documents repeat the steps described before to maintain a document class.
Support of Two Archives
In SAP a document type can only be active for one content repository, but archived contents are also available if the document type is inactive (“L!=X”, see chapter “Link for Content Repository”).
To configure a new archive edit the link of a document type, perform the following steps:
- Create a second content repository. See chapter “Content Repository”.
- Start the transaction “OAC3”.
- To switch into edit mode click “Display/Change” .
- Select the line of the link that should be configured to use the new content repository and click “Copy as”
 . A new line with a copy of the link configuration is created.
 - In the new entry change the “L” property to something different than “X”. Click “Continue”
 to confirm.
 - In the original entry change the “Cont.Rep.ID” and “Link” properties. Specify the newly created content repository.
- Click “Save” to save the configuration.
