

Business Process Management
The integrated workflow system is a core component of Fabasoft Folio.
Executing an Ad Hoc Process
An ad hoc process allows you to define the process flow by yourself. Consequently, you can react flexibly to situations for which no predefined processes are available.
To execute an ad hoc on an object, perform the following steps:
- Navigate to the desired object.
- On the context menu of the object click “Tools” > “Start New Process”.
- Select a template for an ad hoc process or start with an empty template. The step is omitted if there are no predefined processes.
Note: In an empty template, you can also use an existing ad hoc process template by clicking the “Insert Template” button. - If you start with an empty template, define an activity and a participant for the first task in the process. Further information about the possible settings can be found in the next chapter.
- Click “Next”, if you do not want to add further activities.
Otherwise, click “Take”. You can add further activities by selecting an activity and participants and clicking “Take” again. The last activity with a defined participant is considered even if you do not click “Take”.
Note: If you need the ad hoc process regularly, you can save it as template. You can specify the storage location. All saved personal ad hoc process templates can be found under “account menu (your user name)” > “Advanced Settings” > “Workflow” > “Personal Settings” tab > Ad Hoc Process Templates.
The first activity is placed in the work list of the defined participant.
Note:
- In an ad hoc process (possibly parallel), activities with different participants can be defined. Further sequence flows can only be used in predefined processes.
- For ad hoc process templates, the applicability can be defined in the same way as for BPMN processes (Applicable for, Object Class/Category of the File, Object Class/Category of the Teamroom).
- Deadlines can be defined for activities, depending on your settings (“account menu (your user name)” > “Advanced Settings” > “Workflow” > “Personal Settings” tab).
- Deadlines as dates can be entered directly in the overview.
- Initially invisible time spans can be defined using the “Advanced Settings” button.
- You can either define a time span starting from the current time or using a base date. If the base date changes, the deadline is recalculated.
- app.ducx expressions for calculating the deadlines can be defined using the “Advanced Settings” button. The expressions are re-evaluated when the activity would become startable and no value already exists.
Note: If an activity is suspended or delegated, expressions can only be defined if the user has the “Edit BPMN Process Diagrams” policy.
Example:
datetime visibledate = coonow + 86400;
if (coonow.year == 2023) {
visibledate = coonow + 172800;
}
visibledate;
Activities and Participants
Activities
By default, following activities are provided:
- Edit
Allows editing a document. - Forward for Editing (only available in BPMN processes)
Allows editing a document. - Close
Allows closing a document, such that no further changes are possible.
Note: The corresponding context menu command is “Tools” > “Close”. If the object should be editable again, you can execute the “Tools” > “Revert Status ‘Closed’” context menu command. - Close Documents
Allows closing documents within a folder, such that no further changes are possible. - Close File
Allows closing a file, such that no further changes are possible on the file and assigned objects. - Release
Allows releasing a document. The document will be signed with a corresponding signature. If the document is released, additionally a release version is created for the document. - Release and Close
Allows releasing and closing a document. The document will be signed with a corresponding signature and closed, such that no further changes are possible. - Release Documents
Allows releasing documents within a folder. The documents will be signed with a corresponding signature. If the documents are released, additionally a release version is created for the documents. - Release and Close Documents
Allows releasing and closing documents within a folder. The documents will be signed with a corresponding signature and closed. If the documents are released, additionally a release version is created for the documents. - Approve
Allows approving a document. The document will be signed with a corresponding signature. - Approve and Close
Allows approving and closing a document. The document will be signed with a corresponding signature and closed, such that no further changes are possible. - Approve and Close Documents
Allows approving and closing documents within a folder. The documents will be signed with a corresponding signature and closed. - Forward for Approval (only available in BPMN processes)
Allows a document to be forwarded for approval. - Review
Allows reviewing a document. - Forward for Review (only available in BPMN processes)
Allows a document to be forwarded for review. - Take Note
Allows taking note of a document. The document will be signed with a corresponding signature. - Add Remark
Allows adding a remark to a document. - Add Comment
Allows adding a comment to a document (see also chapter “Commenting Documents”). - Send
Allows sending an object as a link or public link. - Send Link
Allows sending an object as a link. - Send Public Link
Allows sending an object as a public link. - Release for Usage (only available in BPMN processes)
Allows a template, form, etc. to be released for usage. In addition, a corresponding signature is applied.
Note:
- Multi-instance activities can be used for processing an activity sequentially or in parallel by several participants.
- If the activities “Review”, “Approve” or “Release” are used in ad hoc processes, the following applies:
- Negative results (e.g. “Approval denied”) are reported via an automatically inserted activity to the person who started the ad hoc process. The remaining commonly prescribed activities that have not yet been completed are set to “Not Executed”.
- Activities for positive results (e.g. “Released”) are only automatically inserted if they are the last activity in the process.
- If the activities “Review”, “Approve” or “Release” are inserted in running processes, negative results are reported to the person who inserted the activities. The remaining commonly inserted activities that have not yet been completed are set to “Not Executed”.
- For objects that are in the worklist, the work steps are also available in the object actions. Conversely, the standard actions of the concerned object are also available in the actions of the activity.
- For activities, the associated work items are displayed in the properties and in the info box. For each work item, the following additional information is displayed if it applies:
- Multiple
- Must Be Executed
- Completes Activity
- Conditionally Visible
- With Precondition
- Executed by (for activity instances)
- Started or Completed (for activity instances; process administrators additionally see the time)
Participants
By default, following participants can be defined:
- Abstract Participant
Abstract participants allow generic sequence flows.- Process Initiator
The participant who starts the process. - Responsible for Process
By default the participant who starts the process. - Process Owner
By default the participant who starts the process. - Current User
The participant who has executed the previous activity or for the first activity, the participant who has started the process. - Property of the Object
The participants are evaluated based on a property of the object (e.g. Last Signature by). - Property of the File of the Object
The participants are evaluated based on a property of the object’s file (e.g. Last Signature by). - Property of the Teamroom of the Object
The participants are evaluated based on a property of the object’s Teamroom.
- Process Initiator
- User
A concrete participant. - Group
A group of participants. - Distribution List
A list of participants (only usable for multi-instance activities).
Note:
- Distribution lists can only be used together with multi-instances.
- A group or property of the object can be used both in multi-instances and in non-multi-instances.
- In the case of multi-instances, a separate activity instance is created for each resolved process participant, in the case of non-multi-instances only one activity instance for the entire group or property of the object is created.
- Distribution lists are immediately resolved at the start of the process. When a Property of the Object or group is used, the process participants are resolved during the runtime of the workflow (when the state of the corresponding activity is set to “Can Be Started”)
- If the property of the object is single-valued and contains a group, all users directly assigned to the group receive an activity. Subordinate groups are not considered.
- If the property of the object is multi-valued, all directly defined users receive an activity. In addition, all directly defined groups receive a joint activity.
Executing a Predefined Process
Recurring processes can be efficiently represented with predefined processes.
To execute a predefined process on an object, perform the following steps:
- Navigate to the desired object.
- In the context menu of the object click “Tools” > “Start New Process”.
- Click “Start Process” to directly start the desired process or click “Open Process” to view the process beforehand.
The first activity is placed in the work list of the defined participant.
Worklist and Ad Hoc Workflow
A central element of the workflow is the "worklist", which lists the activities to be completed (=activities and the working steps to be carried out in it) clearly for individual users in the form of a “To Do” list. Processes are used to define who gets which activities in their worklist and when. The respective users can then edit the activities or influence the process ad hoc within the context of their authorizations via delegations or prescriptions.
The work list consists of following lists (only visible if at least one entry is present):
- To Do
Contains the current activities that have to be processed. - Suspended
Contains activities that are suspended for a defined time span. - Last Finished
Contains completed activities. - Concerned Objects
Contains objects of the current activities. - Tracking
Contains objects of already completed activities.
Starting an Activity in the Worklist
All activities of a user are displayed in his or her worklist. An activity is an activity to be executed, which is divided into several working steps. If you carry out a working step, the activity is implicitly started. But you can also explicitly start an activity.
To start an activity, proceed as follows:
- Locate the activity you want to start
- In the context menu of the activity, click “Properties”.
- Click “Yes”, to confirm, that you want to start this activity.
Executing a Working Step of an Activity
Users can perform the steps defined for an activity if the activity is in the worklist.
To execute a working step of an activity, proceed as follows:
- Locate the working step to be executed in the Work Items column.
- Click the working step, to execute it.
In addition to the name of the work step, the status is indicated in parentheses, if applicable:
- Work step has not yet been executed: no status text
- Work step has already been executed: (repeat)
- Work step could only be carried out once: (executed)
- Mandatory work step that does not complete the activity has not yet been executed: (to do)
- Work step is not yet executable: (not executable)
- Mandatory work step that cannot yet be executed: (to do, not executable)
Suspending an Activity
An activity can be postponed and set to be completed later. The activity is removed from the “To Do” tab and placed on the “Suspended/Pending” or “Long-Term Suspended” tab. After the set period has elapsed, the respective activity will re-appear on the “To Do” tab.
Note: The “Long-Term Suspended” tab is only available if it is correspondingly configured. For this purpose, a time interval has to be defined in the workflow configuration from when a suspension is considered as long-term. As soon as the activity is no longer considered as log-term suspended, it will be moved from the “Long-Term Suspended” tab on the “Suspended/Pending” tab.
To suspend an activity, proceed as follows:
- Locate the activity, which should be suspended.
- In the context menu of the activity, click “Suspend”.
- Define a re-submission date and enter a remark if necessary. The re-submission can be carried out either by a certain date (type: Fixed Date) or after a certain period (type: Time Interval).
- Click “Next”.
Reactivating a Suspended Activity
Activities that have been postponed can be manually reactivated for completion before the period has elapsed.
To reactivate a suspended activity, proceed as follows:
- Click the “Suspended/Pending” or “Long-Term Suspended” tab in your worklist.
- Right-click the activity that should be activated and then click “Activate”.
The activity is removed from the “Suspended/Pending” tab and moved to the “To Do” tab of the worklist.
Accepting an Activity as Substitute
A user can be substituted by another user in a specific role and even personally. Users can act as substitute by selecting the respective role and placing themselves in the context of the access rights for that specific user.
To accept an activity as a substitute, proceed as follows:
- Click the account menu (your user name) and then “My Roles”.
- Click the corresponding substitution role.
- Locate the activity on the “Substitutions/To Do” tab or on the “Substitutions/Other” tab.
- In the context menu of the activity, click “Take Over”.
The activity is moved to the “To Do” tab and the working steps can be executed.
Delegating an Activity
A user can delegate an activity in his/her worklist to another user, which also delegates the process responsibility. The other user receives that activity in his/her worklist.
To delegate an activity, proceed as follows:
- Locate the activity, which should be delegated.
- In the context menu of the activity, click “Delegate”.
- Select a responsible user for the process and click “Next”.
Note:
- If an activity is set to ignore completion, no new activities can be inserted if the following activity has already been prescribed. In this case, the “Delegate Multiple” action is available to still be able to assign a copy of the current activity to multiple process participants.
- If the Team Members Visible to All Members option is disabled for the Teamroom and you do not have “Full Access” in the Teamroom, the “Delegate” action is not available.
Prescribing an Activity (With or Without Template)
A user can prescribe a certain activity to another user. It is also possible to prescribe activities to several users (at the same time or one after the other). Templates can be created and applied repeatedly for prescriptions that are performed regularly.
- Locate the activity, which should be prescribed.
- In the context menu of the activity click “Add New Activity”.
- If prescribe templates are available, these will be offered for selection. Select a prescribe template if applicable.
- In the Activity field, select an activity.
- In the Participant field, specify an abstract participant, a user, a group or a position.
- Define further fields if necessary and click “Next”.
Details for performing a prescribe
In the standard view, the following fields are available for defining a prescription:
- Activity
Defines the activity to be prescribed. - Name
Defines the displayed name for the activity. - Remark
You can enter a remark in this field. - Participant
To define the participants, you can complete several fields.- Abstract Participant
Using this drop-down list, you can select an abstract participant (for example, “Person responsible for process”, “Approver”, “Responsible”). The activity will then be automatically prescribed to the assigned user. - User
By specifying a user, the activity will be assigned specifically to this user. Users can be selected from the drop-down list. Furthermore, a user can be selected from the group hierarchy using the “Select from hierarchy” button, or a search can be performed using the “Find” button. - Group
In this field, you can specify a group to which the activity is prescribed. Groups can be selected from the drop-down list. Furthermore, a group can be selected from the group hierarchy using the “Select from hierarchy” button, or a search can be performed using the “Find” button.
Note: For a group, you can define which position within the group is responsible for the group's work list. Users in this position receive the activity in their work list. - Position
In this field, you can specify a position. The activity will be prescribed to all users in this position. If the activity is started by a particular user, then it will be removed from the work list of the other users.
- Abstract Participant
- Distribution List
When using a multi-instance, you can specify a Distribution List containing several users. The activity will then be prescribed to all users in this list.
Note: A Distribution List can be created by an administrator in an Administration Tool. - Insert Activity More Than Once
Multi-instance activities can be used for processing an activity sequential or parallel by several participants.
Define deadlines
Deadlines can be defined for every prescribed activity. Click “Show Deadlines” to show the fields for specifying deadlines. The following fields are available:
- Date for Submission
In this field, you can define when the activity should be submitted.
Note: Until this date, the activity can be found in the work list of the relevant user on the “Suspended/Pending” tab. - Deadline for Start
In this field, you can define when the activity should be started. - Deadline for Completion
In this field, you can define when the activity should be completed.
Prescribe several activities
To apply the settings for a prescribed activity, click the “Take” button. A graphical preview of the prescribed activities is displayed, and you now have the option to insert additional activities that are also prescribed. Click the relevant “+” button in the graphical display to insert an activity before, after or parallel to an already defined activity and enter the prescribe data.
In the graphical display, you can switch between the individual prescribe activities and edit these again. To do so, click the activity you want to edit. The prescribe data will be displayed again and can be edited. To apply the changes, click the “Take” button.
Change order of the prescribed activities
In the graphical display, you can also change the order of the prescribed activities using the drag and drop feature. To do so, proceed as follows:
- Point to the dotted area of the activity the position of which you want to change, and press and hold down the mouse button.
- Drag the object to where you want to insert the activity. A grey bar indicates that the activity can be inserted at this place.
- Release the mouse button. The activity will be inserted into the desired place.
Delete an activity again
To remove a prescribed activity, select the activity and click the “Delete” button.
Store the prescription as a template
To store the prescription as a template for repeated use, click the “Save as Template” button, enter a Name for the prescribe template and click “Next”.
Advanced view
To switch to the advanced view, click the “Advanced View” button. There you can make additional entries (for example, regarding substitution).
Viewing Processes of an Object
To view the processes of an object, perform the following steps:
- Navigate in the desired object.
- Click the “Properties” action.
- Click the “Processes” tab.
- Click “Open Process” to display the complete process with any loops and conditions. The process flow that has already been executed is indicated by bold lines. Paths that were not traversed are visualized with dashed lines.
- You can use the context menu of the process elements to execute the commands allowed in each case. For example, if you have the appropriate rights, you can change the participant of an activity that has not yet been executed using the “Edit” context menu command.
- To make it easier to terminate processes that are no longer relevant, the “Change State” button is available. This allows you to change the state to “In Progress”, “Suspended”, “Completed” or “Aborted”.
- A started process can be deleted via the "Delete" button as long as no activity has been started.
Note:
- The “Processes” tab is only visible if at least one process is present.
- Completed processes are collapsed by default.
- When you collapse or expand processes, the state is saved.
Viewing Activities of an Object
To view the activities of an object, perform the following steps:
- Navigate in the desired object.
- Click the “Properties” action.
- Click the “Activities” tab.
All current, planned and completed activities are shown.
Note: The “Activities” tab and the fields for current, planned and completed activities are only visible if at least one activity is present.
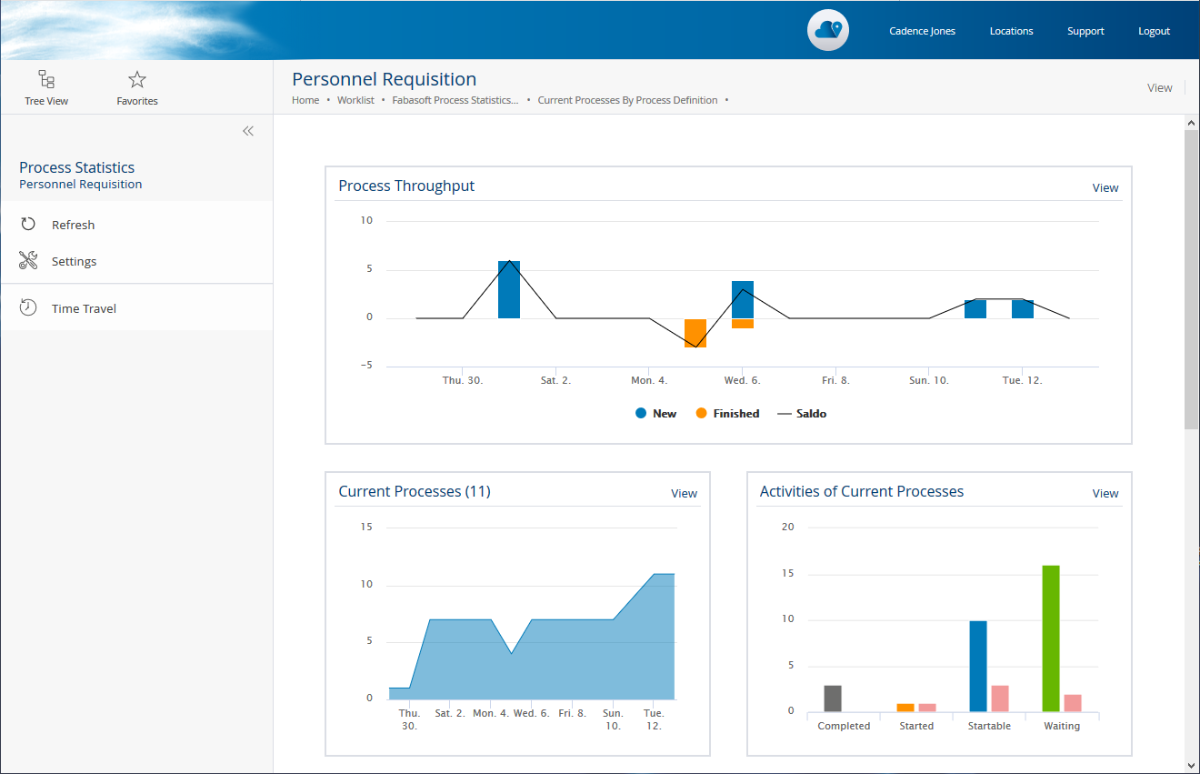
Process Statistics
To obtain an overview of the running processes, several process statistics are available that illuminate the individual aspects of process execution.
Note: The settings can be configured for groups on the “Workflow” tab.
The statistics can be displayed for:
- Process Administrators
Provides an overview of all predefined and ad hoc processes. - Process Owners
Provides an overview of all predefined processes for which the user is defined as the process owner.
Note: The process owner can be defined on the “BPMN Process Diagram” tab of a BPMN process diagram.
You access the process statistics via your worklist. The statistics are available for the following three levels: general overview, process definition and specific process.
General Overview
- Process Statistics
Provides an overview of the number of running processes and delayed processes. - Process Throughput
Shows the number of started and completed processes and their difference in the selected time period. - Running Processes
Shows the number of running processes and their changes in the selected time period. - Running Processes per Process Definition
Shows the percentage breakdown of the process definitions of the running processes. - Current Activities
Shows the percentage breakdown of the current activities of the running processes. - Delayed Activities
Shows the percentage breakdown of the delayed activities of the running processes. - Planned Activities
Shows the percentage breakdown of the planned activities of the running processes. - Activities With Participants Without Access Rights
Shows the activities in which the participant does not have access to the affected object. - Start Date of Running Processes
Shows the number of running processes grouped by the start date in the selected time period. - Due Date of Activities
Shows the activities of the running processes that need to be processed in the next two weeks.

Based on a Process Definition
- Process Throughput
Shows the number of started and completed processes and their difference in the selected time period. - Running Processes
Shows the number of running processes and their changes in the selected time period. - Current Activities
Shows the percentage breakdown of the current activities of the running processes. - Delayed Activities
Shows the percentage breakdown of the delayed activities of the running processes. - Planned Activities
Shows the percentage breakdown of the planned activities of the running processes. - Activities With Participants Without Access Rights
Shows the activities in which the participant does not have access to the affected object. - Start Date of Running Processes
Shows the number of running processes grouped by the start date in the selected time period. - Due Date of Activities
Shows the activities of the running processes that need to be processed in the next two weeks. - Processes
Displays all processes (including completed processes) of the process definition.
Based on a Process
- Runtime
Shows the runtime of the process in days compared to the average runtime of the underlying process definition. - Activities
Shows the percentage breakdown of the status of the process's activities. - Overview
Shows the most important metadata of the process.
Note: The “Settings” action can be used to define the time period (from last week to last year) of the time-dependent statistics.
Settings
In the account menu (your user name), the “Advanced Settings” > “Workflow” entry provides following settings:
“Personal Settings” tab
- Notify Me About the Following Events
You can define for which workflow events you want to be informed by e-mail or push notification.
Note: To receive push notifications, you must allow them in your web browser or Fabasoft App. Additionally, push notifications must be configured by an administrator for the installation. - Use Advanced Mode for Prescriptions
Defines whether the graphical or tabular process editor is used for prescriptions. The tabular process editor is especially defined for users who rely on keyboard operation. - Define Deadlines as Time Span (Instead of a Date)
Defines whether deadlines are entered as time span instead of a date. - Show Advanced Settings for Deadlines in Ad Hoc Processes
Allows you to change the way you enter deadlines. Additionally, you can specify the type of escalation. - Show Deadlines for Ad Hoc Processes per Default
Defines whether the deadlines are displayed by default when prescribing. - Show News About Activities Which Have to Be Done on the Welcome Screen
Defines whether news about activities in the worklist, which have to be carried out, are shown on the welcome screen. - Automatically Open the Next Activity After Finishing an Activity
Defines whether when finishing an activity, the next activity will be opened or whether the “to do” list will be opened. - Ad Hoc Process Templates
Contains your personal templates for ad hoc processes. If a template is no longer needed you can remove it. - Predefined BPMN Processes
Defines your personal BPMN processes that are released for execution. - Predefined Escalations
Defines your personal escalation definitions that are released for execution.
“Approval Processes
Approval processes comprise those process definitions and activity definitions that Fabasoft Folio provides as standard.
Obtain Approval for a Business Object
For each business object, you can define a responsible user for the various tasks. These responsibilities are entered on the “Document” tab in the Responsibility field of the business object. If responsibilities have been defined in a Category, they are automatically taken over by the assigned business objects. The responsibilities can be adjusted in single business objects.
Note: If for the “Approve” role no responsible user has been defined, the “No participant defined” error message is displayed when executing the approval process.
To obtain approval for a business object, proceed as follows:
- Select the business object you want to have approved.
- Execute the “Tools” > “Initialize Process” > “Approval Process” command.
The approval process will then be initiated for the business object and the user responsible receives the Approve activity in his/her work list.
After the approval you get the Approved activity, if the business object is not approved you get the Approval denied activity. Both activities can be finished clicking Accept.
Approve a Business Object
To approve a business object, proceed as follows:
- Locate the Approve activity for which the business object for approval is displayed in the Applies to column.
- Click the Open work step to view the documents for approval.
- Click the Approve work step.
- Enter your password.
- Type a Remark and click “Next”.
Note: The approval (including the remark) will be added to the business object on the “Signatures” tab. In addition, the approved status of the object will be backed up in the form of a recorded or approved version.
Refuse Approval of a Business Object
To refuse approval of a business object, proceed as follows:
- Locate the Approve activity for which the business object for approval is displayed in the Belongs to column.
- Click the Open work step to view the documents for approval.
- Click the Refuse Approval work step.
- Enter your password.
- Type a Remark and click “Next”.
Note: The non-approval (including any comment) will be added to the business object on the “Remarks” tab.
Business Processes With BPMN 2.0
The support of BPMN 2.0 (Business Process Model and Notation) allows you to model business processes and benefit from the advantages of a platform-independent notation. The created process diagrams can be directly executed with the Fabasoft Folio Workflow Engine.
For BPMN process diagrams a meaningful presentation is chosen depending on the context. In PDF overviews, when using the Folio network drive or the Fabasoft App a picture of the process is displayed. In exported process diagrams (ZIP file) a PNG file and an SVG file (vector graphic) are provided as graphical preview.
Besides process diagrams also choreography and conversation diagrams can be created.
Creating a BPMN Process Diagram
BPMN process diagrams are used to model business processes, which can be directly executed. The BPMN process diagrams can be used in the context in which they are defined or referenced. To make BPMN process diagrams generally available, use a process folder or collection for templates and presettings in “Customizing”. Otherwise, BPMN process diagrams can be stored in app configurations (“Processes” widget), in app rooms (“Templates and Presettings” action > “Process Templates” widget) or in Teamrooms (“Templates and Presettings” action > “Process Templates” widget).
To create a process diagram, proceed as follows:
- Navigate in the “Processes” or “Process Templates” widget in the desired context.
- Click the “Create Process” or “New” action.
- Enter a name and click “Next”.
- In the context menu of the process diagram, click “Open”.
- Model the desired process and click “Next”.
More information about working with the BPMN editor can be found in the next chapter. - In the context menu of the process diagram, click “Release for Usage” (not necessary in the context of a process folder).
Note:
- In the properties of the BPMN process diagram, on the “Process execution” tab, the Automatically Suspend the Process When Deleting the Affected Object and Activate It When Restoring field defines whether the process is automatically suspended when the affected object is deleted or canceled and again activated when the object is restored.
- To be able to use a BPMN process that is defined in the context of a process folder, it must be referenced in the personal workflow settings (“account menu (your user name)” > “Advanced Settings” > “Workflow”).
- To be able to use a BPMN process that is not defined in the context of a process folder, on the one hand the users must be authorized in the corresponding room and on the other hand the BPMN process must be released for usage.
- On the “Process Execution” tab, all released instances are displayed in the Release Version field and the Formerly Released for Execution field.
- Changes can be released using the “Re-Release” context menu command. Processes that have already been started continue to run according to the old released BPMN process diagram. New processes are initiated based on the currently released version.
- You can withdraw the release with the “Withdraw Release” context menu command.
Working With the BPMN Editor
In the graphical BPMN editor, besides the modeling of the process, for example Folio users and activity definitions can be assigned to BPMN elements, in order to be able to execute the process directly with the Fabasoft Folio Workflow Engine.
The BPMN editor is subdivided in three areas. The left pane contains the BPMN elements that can be dragged and dropped on the middle design pane. The right pane (folded by default) shows properties for the element that is currently selected in the design pane. The right pane is also used to assign Folio objects for process execution purposes.
The keyboard shortcuts Ctrl + Z and Ctrl + Y can be used to undo and redo actions. Ctrl + S allows saving changes made in the editor. For copying, cutting, pasting and deleting elements the keyboard shortcuts Ctrl + C, Ctrl + X, Ctrl + V and Del are provided. The executability of the process can be checked with the “Check Executability in Fabasoft Folio” button.
Executable process must or may contain following elements:
- Pool
The pool consists of activities of a delimited unit (e.g. an organization). Exactly one pool per process diagram can be put into execution. Thus, the Is executable property must be set to “Yes” for one pool.- In the Applicable for field, click the “Edit” button to define the following settings.
- The Applicable for property is used to restrict processes to object classes and categories. This way processes are only offered if they are useful for the object, on which the process should be executed. When selecting activities for tasks in the BPMN editor, only activities are provided that correspond to the applicability of the process diagram. If the process is restricted to a category of a user-defined form, the defined fields can be used in the condition editor. If the process is restricted to the category of a user-defined base form, the process can also be used for forms derived from the base form.
- The Object Class/Category of the File property can be used to define the object class or category of the object’s file. This allows access to the properties of the file when defining the abstract participants “Property of the File of the Object” and “Role by Property of the File of the Object”.
- The Expression for Determining the Visibility property defines an app.ducx expression that determines whether the process is offered for selection when a process is started.
- The Expression for Determining the Usability property defines an app.ducx expression that determines whether the process can be started. This allows, for example, to check preconditions that must be fulfilled before the process can be started.
- In the Initializations field, click the “Edit” button to define the following setting.
- The Expression for Initializations property defines an app.ducx expression that allows defining common initializations and global process parameters.
- In the Applicable for field, click the “Edit” button to define the following settings.
- Lane
Lanes represent responsibilities. A Fabasoft Folio workflow participant can be assigned to a lane. When creating tasks the values defined for the lane are used as default values for the tasks, which allows comfortable working.
Note: When creating a pool one lane is implicitly generated. - Start event
The process flow starts with a start event. For documentation purposes all types of start events can be used in executable processes. But the start event type has no effect on the execution of the process. - Conditional start event (optional)
A wait action can be implemented using an conditional start event. The process is not started until the condition (app.ducx expression) has been fulfilled. The check interval determines how often the condition is checked. - Intermediate conditional event (optional)
A wait action can be implemented using an intermediate conditional event. The process is not continued until the condition (app.ducx expression) has been fulfilled. The check interval determines how often the condition is checked. - End event
The process flow ends with an end event. - Terminate end event (optional)
Terminates the whole process (incl. subprocesses) and the process is marked as completed. When used in subprocesses, only the subprocess is terminated (without special marking). - End error event (optional)
Terminates the whole process (incl. subprocesses) and the process is marked as aborted. When used in subprocesses, only the subprocess is terminated (without special marking). - Task
A task represents an atomic unit of work that has to be done within a process. Currently, tasks of type “User” are supported. The task must have a Fabasoft Folio activity and one or more participant assigned. When carrying out a process the tasks are displayed in the worklists of the corresponding users.- If the activity “Execute Expression in Background” is used, an app.ducx expression can be executed in the background. The process is not continued until the background task has been executed.
- Deadlines can be defined as date, time span or expression (Enter Deadline as field). The “Advanced Settings” button takes you to all deadlines.
- The Started Activity Remain in All Worklists field can be used to define whether the corresponding activity is removed from the worklists of the additional affected participants when the activity is started.
- The Ignore Completion field can be used to define whether subsequent activities can be started although this activity has not yet been completed.
- The Skip Invalid Participant field can be used to define whether the activity is skipped for an invalid participant (e.g. inactive user, missing license).
- The Display Activity Only if the Participant Has Access to Affected Object field can be used to define whether the activity is only displayed in the worklist if the participant has at least read rights to the affected object of the process.
Note: If the activity is not visible to any participant, the process stops. When starting the process, no warning is displayed if the activity goes to a team in which at least one user has rights to the affected object. - The Disable Substitution field can be used to define whether the activity may be executed by a substitute.
- The Escalation field you can overwrite the escalation definition that is stored with the respective activity definition. The default escalation is defined for all Fabasoft Folio activity definitions. If the default escalation is used, a welcome screen entry is shown and a notification e-mail is sent to the current workflow participant if the start or completion date is exceeded.
- In the Expression When Completing the Activity field an app.ducx expression can be defined that is executed when completing the activity.
In the app.ducx expressions, you can use object to access the object of the process. - A loop type can be defined for tasks.
- None
From the defined activity, one instance is created, which is offered to the defined process participants in the worklist. The first process participant, starting the processing, takes over the activity. The activity will be removed from all other worklists. - Standard
Tasks can be run in a loop. The loop condition can be tested before or after the iteration. The maximum number of iterations can be defined, too. - MI Parallel
From the defined activity, one instance is created for each defined process participant and stored parallel in the respective worklists. All process participants must process the activity. - MI Sequential
From the defined activity, one instance is created for each defined process participant and stored sequentially in the respective worklists. All process participants must process the activity one after the other.
- None
- If an activity such as "Approve", "Release", "Review", “Sign”, “Close”, “Approve and Close”, “Release and Close” or “Close File” is denied, activities are not executed if they belong to the same multi-instance task. The default behavior can be changed by the process parameter keepactivitiesstarted: process.SetProcessParameter("keepactivitiesstarted", true);
- The signdialogtitle, signdialogheading and signdialogdescription process parameters can be used to customize the texts of the sign dialog. For multilingual strings, a LanguageStringList can be provided.
For example: process.SetProcessParameter("signdialogtitle", "Sign");
- Sequence flow
The sequence flow describes the order of events, tasks and gateways. A condition expression (Fabasoft app.ducx Expression Language) may be assigned to a sequence flow outgoing from a gateway. The expression can be entered directly in the text field or can be defined in the condition editor. - Gateway (optional)
A gateway allows the distinction between cases or parallelization in a process. Currently data-based exclusive gateways and parallel gateways are supported. For a converging parallel gateway, the join type (AND or OR join) can be defined. - Subprocesses (optional)
Subprocesses are used to enclosure complexity. Subprocesses can be nested and run in a loop (type “Standard”). The loop condition can be tested before or after the iteration. The maximum number of iterations can be defined, too.- Expanded subprocess
An expanded subprocess is embedded in the process as structuring element. - Collapsed subprocess
A collapsed subprocess references a separate BPMN process diagram that is therefore reusable. Released changes to subprocesses are taken over when subprocesses are expanded.
- Expanded subprocess
- Artifacts and data objects (optional)
For documentation purposes all artifacts and data objects can be used in executable processes. But these elements have no effect on the execution of the process.
Note:
- Go-to sequence flows can currently not be executed.
- In the app.ducx expressions global process parameters can be defined, to influence the process execution.
process.ClearProcessParameters();
process.SetProcessParameter("key", "value");
process.GetProcessParameter("key");
process.GetProcessParameters(); - The keeporiginaldiagramversion process parameter can be used to specify whether the at the start of the process released versions of subprocesses are retained. This way, re-releasing subprocesses does not affect processes that are already running: process.SetProcessParameter("keeporiginaldiagramversion", true);
- GetNextActivityInstances can be used to determine the following activity in app.ducx expressions. HasValidParticipant can be used to check the validity of the participant.
- When initially defining a condition, you can decide whether you want to define the condition using the condition editor (graphical user interface with predefined properties) or the code editor (app.ducx expression). Subsequent changes will open the corresponding editor directly. You can switch from the condition editor to the code editor using the “Open Code Editor” button. In doing so, the condition is taken over, but must be manually converted into a valid app.ducx expression.
- Condition expressions are evaluated with NOCHECK. This avoids evaluation errors that properties are not assigned to the object class.
- Using the “Show Overview of app.ducx Expressions” context menu command, you get an overview of all app.ducx expressions defined in the process and, if applicable, in the subprocesses. This facilitates troubleshooting in particular.
Multilingual Names
If you assign or change your own names for process elements in the BPMN editor, these are saved in the current user language. For users with different language settings, you can store the translated names on the “Translations” tab. In this way, the name is displayed in the BPMN editor and also in the worklist according to the language settings of the respective user.
Downloading and Uploading a BPMN Process Diagram
BPMN process diagrams may be exported and imported. In case of an executable process diagram, possibly assignments to Folio objects have to be adapted, if the Folio objects are not available in the target system. Component objects will be identified by the reference. Non-component objects will be identified by the External Key (if defined by the administrator) or object address.
When downloading BPMN process diagrams, the following options are available:
- Download Diagram With Preview
Downloads the XML representation and preview images of one or more BPMN process diagrams including any sub-processes that may be contained. - Download
Downloads the XML representation of one or more BPMN process diagrams including any sub-processes that may be contained. - Upload
The downloaded BPMN process diagrams can be uploaded again (also in another installation if applicable). Either a single XML file or an entire ZIP file can be uploaded. If a ZIP file is uploaded, existing diagrams can be updated.
Download
To download a process diagram, proceed as follows:
- Navigate in the process diagram and click the “Download” or “Download Diagram With Preview” action.
- An XML file or ZIP file will be downloaded that contains the process diagram as XML file.
Note: To download several processes at once as a ZIP file, select them and execute the “Download” or “Download Diagram With Preview” context menu command.
Upload
To upload a process diagram, proceed as follows:
- Navigate in the process diagram and click the “Upload” action.
- Click the “Select File” button.
- Enter the path to the process diagram XML file and click “Next”.
- Click “Next” and “Close”.
Note: To upload several processes at once as a ZIP file, navigate in a process list and click the “Upload” action.
Creating Escalation Definitions
When workflow deadlines expire, the affected workflow participant is notified by default via welcome screen and e-mail. However, you can also define your own escalation definitions and use them with the respective activity.
The escalation definitions can be used in the context in which they are defined or referenced. To make escalation definitions generally available for Teamrooms (but not for app rooms), use a collection for templates and presettings in “Customizing”. Otherwise, escalation definitions can be stored in app configurations (“Processes” widget), in app rooms (“Templates and Presettings” action > “Process Templates” widget) or in Teamrooms (“Templates and Presettings” action > “Process Templates” widget).
Settings of an Escalation Definition
- Name
The name of the escalation definition. - Escalations
Defines the desired escalations.- Escalation Time
Defines the time of escalation.- Time Span
Defines a time span in days, hours and minutes (working days are not considered). If no operator and base date are specified, the time span is starting from now. - Operator
Defines whether the time span is added to or subtracted from the base date. - Base Date
Defines the base date for calculating the deadline (“Visible in Worklist From", “To Be Started at the Latest by” or “To be Completed at the Latest by”). If the base date changes, the deadline will be recalculated.
Note: For “Visible in Worklist From", escalations probably do not make sense, as the activity is automatically moved to the “To Do” list.
- Time Span
- Repetition
Defines how often the notification should be repeated.- Time Span Until Next Escalation
Defines a time span in days, hours and minutes until the next notification (working days are not considered). Leave blank if you do not want a repetition. - Repeat Until
Defines how long the notification will be repeated (“Infinite”, “Date”, “Date Value of a Property”). - End Date/Date Value of a Property
Depending on Repeat Until an end date or a property can be defined.
- Time Span Until Next Escalation
- Recipients of Escalation Message
Defines the recipients of the notification (e.g. "Current Participant" or "Responsible for Process"). - Expression for Computing the Subject
Allows using an app.ducx expression to change the default subject of the notification e-mail. - Expression for Computing the Additional Message
Allows using an app.ducx expression to add an additional text to the notification e-mail.
- Escalation Time
- Applicable for
The use of the escalation definition is restricted to the listed object classes and categories of the object. - Object Class/Category of the File
The use of the escalation definition is restricted to the specified object classes and categories of the object's file. - Object Class/Category of the Teamroom
The use of the escalation definition is restricted to the listed object classes and categories of the object's Teamroom.
Note:
- If no date can be determined, no notification will be sent.
- If the escalation definition is no longer usable in the corresponding context (e.g. due to a change in usability), no notification is sent.
Default Escalation
With the generally available default escalation, a notification is sent to the current workflow participant one minute after the expiration of To Be Started at the Latest by and To be Completed at the Latest by. The notification is repeated daily. The default escalation is defined for all Fabasoft Folio activity definitions.
Executing a BPMN Process
To execute a BPMN process on an object, proceed as follows:
- In the context menu of the desired object, click “Start New Process”.
- Select a predefined BPMN process.
The process is started on the object.
Managing BPMN Process Diagrams
For managing business processes under “account menu (your user name)” > “Advanced Settings” > “Workflow” the tab “Personal Settings” is provided. The Ad Hoc Process Templates and Predefined BPMN Processes fields show an overview of the templates and BPMN processes that are available for the user. You can edit your personal settings.
Note: BPMN processes that can be used by the user can also be defined via the user's group (“Workflow” tab > Group Workflow Preferences > Predefined BPMN Processes).
Process Folder
The process folder allows you to file processes in a structured way and link them with documents, participants and outputs. The processes can be viewed and analyzed from different angles.
The process folder is structured in following four areas:
- Processes
A modeled business process can reference subprocesses, documents, participants and outputs. - Documents
The documents that are needed in the process. - Participants
A participant represents an area of responsibility within a process. - Outputs
An output defines a result of a process. Outputs can be structured with help of output groups.
In each area a folder is provided that lists all corresponding objects of the process folder as a not hierarchically structured list.
Processes, participants and outputs that are assigned to the process folder but currently not used in the structure are shown on the “Recycle Bin” tab of the process folder.
For each document, participant and output you can view the related processes at any time.
Defining a Process
To define a process, proceed as follows:
- Navigate in the process folder to the “Processes” list.
- Create a new BPMN process diagram, or add an existing one.
- In the context menu of the process diagram, click “Open”.
- Define the process. On the right section (by default collapsed), you can assign documents, activities and participants to the BPMN elements.
- A Fabasoft Folio process participant can be assigned to pools, collapsed pools, lanes, tasks and additional participants. You can define either a Process Participant or a Process Participant (Execution). If you do not just document the process but also want to run it in the Fabasoft Folio workflow, use the Process Participant (Execution).
- A Fabasoft Folio activity can be assigned to a task.
- Fabasoft Folio documents can be assigned to every BPMN element.
- A BPMN process diagram can be assigned to a collapsed sub-process.
- Click “Next” to complete the editing.
To assign outputs to a BPMN process diagram, edit the properties of the BPMN process diagram. Define the outputs on the “Process Folder” tab in the Outputs field.
Note: On the “Process Folder” tab of a BPMN process diagram the sub-processes, documents and participants are listed that are defined in the process diagram. In the detail view on the desk, the information can also be found on different tabs.
Defining Documents, Participants and Outputs
You can define documents, participants and outputs implicitly via BPMN process diagrams, as described in chapter “Defining a Process”. Alternatively, you can define documents, participants and outputs in the corresponding lists of the process folder and use them in the BPMN process diagrams.
To define a document, a participant or an output, proceed as follows:
- Navigate in the process folder to the appropriate list.
- Search for existing objects or create new documents, participants and outputs.
Note: You can use output groups to structure outputs.
Show Related Processes
To show the processes that are assigned to a document, a participant or an output, proceed as follows:
- Navigate in the process folder to the desired document, participant or output.
- In the context menu of the object, click “Tools” > “Show Related Processes”.